Homemade Fruit-By-The-Foot
Hi everyone! It's Tara from Suburble again, and today, I'm sharing a super fun recipe to do with (or without) the kiddos!
We're all getting back into the swing of things now that school is in session. I know that my life is slowly starting to develop a schedule (and the kids are gradually warming up to the idea of an earlier bedtime), and now I'm thinking of fun ways to have fun when we're not worrying about school or getting things done.

A recipe that is a lot of fun to make (and eat) is Homemade Fruit-by-the-Foot. Yes, you can make this at home. And yes, this is a healthier, dye-free and chemical-free recipe! It's a great addition to any lunchbox!
 The recipe for Homemade Fruit-by-the-Foot is simple.
You need:
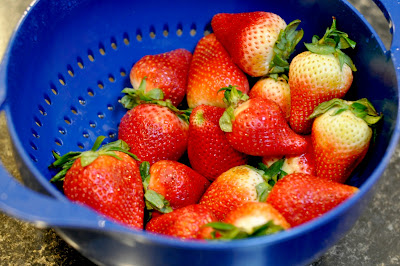
1 lb of fresh strawberries, washed and hulled
¾ cup of sugar
1 teaspoon lemon juice (the original recipe says "fresh lemon juice", so I thought cheeky thoughts as I squeezed out a tablespoon of juice from the bottle)
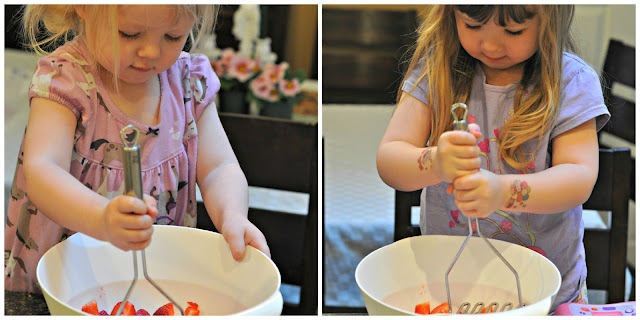
You will also need to start this recipe fairly early in the day. Notice how both of my helpers are still clad in pyjamas? This because your happy little fruit leathers will have to spend at least 5 hours - yes FIVE HOURS - in the oven. We started prepping our fruit at around 7:30 in the morning. I was obviously still suffering from Early Morning Hazy Decision Syndrome, or else I would have done a little bit of wrangling when it came to those straggly hair situations.
Mix your three ingredients together, then mash your strawberries with a potato masher. Fight with your sister over whose turn it is to barely make a dent in a strawberry. Build up enough tension in your mother's shoulders so that when it is her turn to mash the fruit, it takes her only two minutes to turn them into pulp. "Hulk mash berries! Rarrrhhh!"
The berries have to sit for about a half hour, stewing in their juices and breaking down into a beautiful syrupy mess. It's tough not to just dump it onto ice cream and call it a day. Instead, dump it into a blender and turn it into a smooth puree (about 1-2 min).

Cook the puree over medium/high heat until it boils. Let it simmer for about a half hour. The puree will thicken and stick to itself. When you drag your spatula through the puree, it will leave little "roads", as the puree heaps to itself. Now you're ready for business.
Spread the puree - and this is the tough part - onto two cookie sheets lined with silicone liners. Parchment will work as well. Try not to let the puree spread too thin in spots. This will just turn into a brittle candy and not be flexible. You won't be able to fill a whole cookie sheet, so don't worry about that. Just try to keep an even layer of about ⅛" puree.
After you've fought with the puree and finally created an even, intact layer of gooey goodness, then you pop it into your oven. Because you are essentially dehydrating these strawberries without a traditional food dehydrator, the oven has to be extremely low. My oven will go down to 175 degrees. The original recipe says that if your oven doesn't go down that low, you can "hack" your oven temperature down by opening the oven door.
Bake the fruit leathers for 5 hours. I know. It seems crazy. Just set your timer and do something else.
After about 5 hours (and this depends on your oven temp, so check sooner if your oven had to run a bit higher), check your fruit leather. It should be tacky, but not sticky or gooey. Take the parchment/liners and fruit leather off of the pans and let them cool entirely on wire racks.
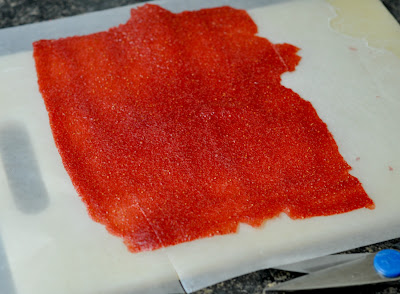
After they've cooled, peel off the fruit leather and place them onto wax paper. Be sure to leave an overhang of about an inch. This is imperative in the "rolling up" process. Cut the fruit leather into one inch strips with kitchen scissors.
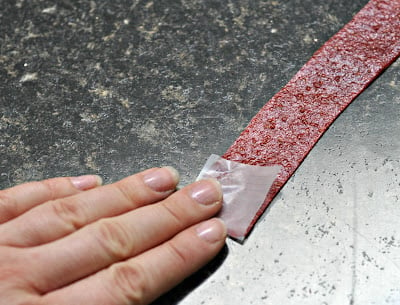
Fold the overhang over the strip prior to rolling; this is to prevent Fruit-by-the-Foot stickage. Continue rolling up the fruit leather until you have a tidy little roll. Keep this up until all of your fruit leathers have now become strawberry rolls-of-awesomeness.
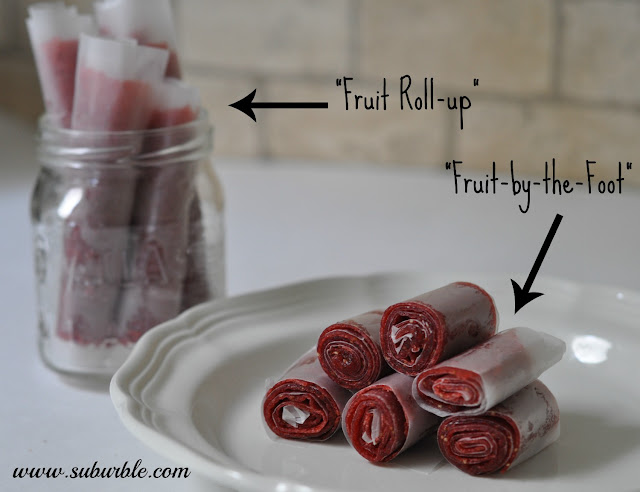
While this tutorial is for Fruit-by-the-Foot, I did make some larger "Fruit Roll-up" sized leathers. They worked in essentially the same way as the rolls, only they were cut into larger squares. After comparing the two, I felt that for my little beaners, a smaller roll was the perfect size for them. And while there aren't any nasty chemicals or dyes in this snack, there is sugar. Oh delicious, beautiful sugar.... you convince my children to recreate scenes from "Lord of the Flies". A smaller portion-size is perfect for our house.
And when Hubby is snacking right alongside the kiddos, it's nice to have a higher yield in a recipe. I'd say that the grown-ups in the house enjoyed these strawberry wonders just as much - if not more - than the under-5 set did.
Let me know if any of you wild and wonderful people try out this recipe. I promise that you will not be disappointed!
Visit me at Suburble! We're always cooking/painting/sewing/wrecking something!

Do you have to use sugar? Stevia or just less sugar ok?
I wonder how frozen fruit would work with this recipe? Anyone ever give it a try?
Is there a tried and true way to store them if you make a large batch? or do they not spoil easily?
I made them using peaches and I dried them longer. They stayed good for about a month in the fridge
These look great! I make something similar, but I don't worry about heating the berries and they still taste great. I have a large dehydrator so instead of baking them I put a bunch in the dehydrator, let it work its magic while I sleep, and wake up to a bunch fruit roll ups!
*I do boil rhubarb before I puree it in the food processor when I make strawberry rhubarb roll ups.